Gray and White painted kitchen table

Today I'm sharing my new and improved dining room table that I painted gray!


painted furniture, gray table, gray and white table, how to paint a kitchen table

We've had our kitchen table about 9 months.
I bought it from Craigslist because I loved the size.
It's a square shape with some interesting curves, that fits our family perfectly.
Plus I can add the leaf when we have guests.
While I really love the table, I definitely didn't love the original color
which was yellowy stain and legs.
I have always planned on painting it.  


I debated for months what color I wanted to paint it 
and finally decided on white legs with a worn grey top.


gray and white painted kitchen table, yellow stain before


This is the before.  
So yellow.  
It looked terrible with our dark wood floors.  
But the shape is beautiful and I could see it's potential!  


how to paint a kitchen table


I posted this photo update on instagram.  
(do you follow me @shescraftycrafty)


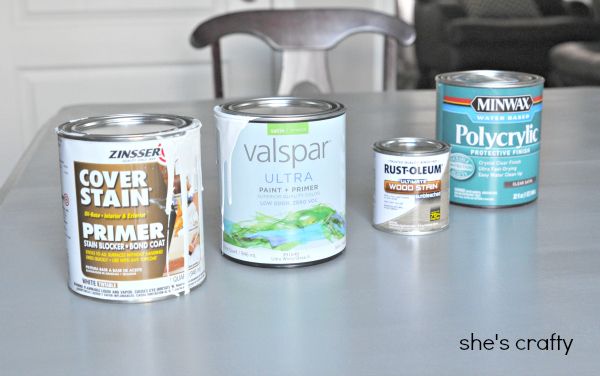
Here are the products I used and the steps 
I took to give my table a makeover. 
There are amazon links to the products below.   


First of all, I left the table in my dining area inside my house. 
I covered the floor with a huge drop cloth.  
It's darn hot outside and I wasn't about to go out there!!


-I lightly sanded the table with 150 grit sand paper.  
Then wiped it down really well with a damp rag.


paint kitchen table


-I used 2 light coats of  Zinsser stain blocking primer.  


angled brush, small roller to paint kitchen table


To apply the primer I used an angled brush for the
 legs and apron and a foam roller for the top of the table.   
I waited about 2-3 hours in between each coat, 
even though the can says it can be re-coated in an hour.  
I let it dry over night after the 2nd coat.

-The next morning I painted the legs and the top with 
2 light coats of white Valspar Ultra Paint plus Primer.  
I lightly sanded in between each coat with 220 grit sandpaper 
and let it dry for another 2-3 hours.  

-Next I painted the top of the table gray.  
I don't have a picture of the paint I used for the top but it was Glidden brand.
 I then let that dry over night. 


painted kitchen table, gray and white paint


-In the morning, I lightly sanded the entire top 
and then went a little heavier on the edges for a worn look.  
I wiped it down really well with a wet rag.  

all over the table with a rag. 
I rubbed it into the legs, the apron and all over the top.  
It's a really light color of stain but gives the paint some dimension. 
 It also seemed to harden the paint and give it a little protection. 
I LOVE the way it turned out!  
I then let that dry over night.  
(seriously- all of this drying overnight business made this project take forever!!!)

-The next morning I used 2 light coats of Minwax Polycrylic top coat
 I very lightly sanded between each coat.  


how to paint a kitchen table


-Then I let the table dry and cure for 2 days.  


farmhouse kitchen table, gray and white table


farmhouse kitchen table


Painting this table took forever, but it was totally worth it.  
I love it so much!  
It gave me that farmhouse look that I love!!


painted gray and white kitchen table


I can't wait to have people over to eat and see my pretty table.  
Anyone want to come over??


DIY arrow earrings

I am nuts over arrows!

So when I found some cute arrow charms at the craft store, I had to make some earrings out of them.  


The earring were really simple to make and were really inexpensive too!


I bought the arrow charms and kidney ear wire pieces from Hobby Lobby.  Jewelry was 1/2 price the week I bought them, so my earrings cost less than $2.  Score!!  


The only thing I did was thread the arrow charm onto the wire.  SIMPLE!!  


Here is my sweet girl modeling the earrings!  Love them!!


Boys Room- grey, red and black

My boys ages 12 and 5 share a bedroom.  It's a huge room so there's plenty of space for both of them but decorating it was difficult.  My littlest wanted Star Wars and my oldest wanted Harry Potter or Pokemon.  Um, yeah.  Not exactly the look I wanted!!  So we compromised and I think it turned out pretty well.


I have to tell you, with my room makeovers, I don't stage them.  Sure, I make beds, pick up legos and straighten pillows but for the most part, what you see in these photos is typically what their room looks like on a daily basis.  


For their bedding, we used comforters from Target, sheets from Walmart and I made the chevron pillow covers for their Euro pillows and the striped cases for the travel sized pillows. You can also see their headboards, striped bulletin boards and arrow art.  


Here is the gallery wall in their room.


We used a variety of photos and art in our color scheme. 

Sources
Yoda Print (mod podged onto wood)
old ruler with instagram photos
photo of Jesus my oldest has had in his room since birth
Star Wars photo with my boys' faces from DisneyWorld
Keep Calm canvas from Target a few years ago
 Harry Potter print (mod podged onto wood)


Above the wall gallery is a long shelf for trophies, Lego creations and other boys treasures.  I made it from a long 1x6 from Lowes and shelf brackets from IKEA. 


On the other side of the room, this shelf holds more trophies and treasures and the shelf brackets make a great holder for the curtain rod.  This room gets super hot in the afternoon when the sun beats down.  So I put short, red thermal curtains.  Short curtains wouldn't be my first choice, but the window is near one of the beds and long curtains would be stepped on.  I did add some arrow trim to the bottom of the curtains.  I used white panels hung on a tension rod on the inside of the window.


We have a large Expedit with bins that hold all of their Legos, Nerf guns, balls etc.  


On top is a small collection of globes and some chalk art.


We are pretty happy with this room.  And it works out pretty well for both of our boys.


Kids summer treasure boxes

This is a guest post I did for Design Dazzle in June.


We are in full on summer mode in our house with laid back days of sleeping in, swimming, going to the movies, staying up late and other adventures.  One of my goals for this summer (and every summer) is to make memories!  I hope my kids remember their childhoods as full of fun and excitement.  One way to do that is to give them somewhere to store all of the small treasures they are finding along the way, so we made summer treasure boxes 


They are super simple and fun to make.  Even my "too cool to do anything" almost teenager enjoyed making his box. 


We started with plain paper mache boxes and a ton of stickers from the craft store.


I got out a bunch of acrylic paints from my stash and turned my kids loose on their boxes.  My little guy painted his all black.  


My girl took a more colorful approach with her box.


And my oldest designed his own box to match his stickers.


After the paint was dry, they got busy adorning their boxes with stickers.


I loved watching my littlest's hands working the stickers. 


They are pretty proud of their creations!  (Again, my oldest was too cool to have his photo taken- boo to him becoming a teenager!!)


I can't wait to see what they fill their boxes with.  


I hope you all have a fantastic and fun summer filled with lots of adventures!


Thanks to Toni and her team for having me at Design Dazzle!!


Come visit me over at She's Crafty

You can also find me on Instagram, Pinterest, Facebook and Twitter


Summer themed mantel and a blog hop

July's Blog Hop
Life's a Beach!
8 Blogs 8 Awesome "Beachy" Ideas

Nothing is more relaxing then feeling the sand between your toes and listening to the waves roll in as you relax in a chair on the beach.  The closest I've come this year is the city pool.  (Wah, wah)

So if you are wishing and dreaming of being at the beach, like me, come see what my bloggy friends and I did this month for our "Beachy" best!  Pull up a seat, put your feet in a kiddie pool, grab an ice cold drink of your choice and cool off with these refreshing ideas. 

8 Blogs 8 Awesome "Beachy" ideas that will rock your world!!!

Stop by and visit all my AMAZING Bloggy friends and check out how the Beach has inspired them!! 

1. Emily of The Benson Street 
2. Adrienne of Free Time Frolics
3. Ashley of Flats to Flip Flops
4. Rebecca of The Crafted Sparrow
5. Andie of Maybe I Will
6. Melissa of Hollyhocks & Honeybees
7. me
8. Kaylnn of Among the Young


Here is my mantel dressed up for summer! I went for a slightly muted colored scheme with yellows and blues thrown in since I'm loving those colors lately!  Let me take you through the it!


I fancied up a plain Jane white candle with some twine and put it on a book page candle stick.  It's in front of a silver plate from my collection.


For the center part of my mantel I used my chevron wall art as the back drop.  I added a punched circle banner, a blue Mason jar full of shells (from an actual beach in Gulf Shores, Alabama) on a pedestal and a star fish (brought back by a friend from her trip to Florida).


On the right I put some cute ball flowers (what are they really called anyway?) from a craft show last year, in a decorated jar.  (A tip on jars- don't throw out spaghetti or pickle jars.  Just run them through your dishwasher, take off the labels with an adhesive remover like Desolv It (amazon link), and use them to decorate.) The jar is in front of another silver platter from my collection.  


More pics:


Don't forget to check out the Amazing projects on my friend's blogs!  

Get to Know Your Group with the M and M game

Have you ever been in a group with people who don't know each other very well?  Oh goodness, I think we all have.  We all stand there looking around and shuffling our feet, waiting for the moment to be over!  

I have a way to end that awkwardness - an ice breaker Get to Know you Game with M and M's.


Get to Know you Games - M and M's to get to know your group!


Holiday Paper Crafting

I love decorating for the Holidays! But buying new items each season can get pricey! So when I decorated for July this year, I gave myself a challenge to make my decorations. It was a good way to be creative and use the things I already had on hand.


Using some super cute paper, I made pinwheels and 2 different garlands!
 
 
The polka dot garland was very simple!
 
 
I simple cut many circles out of colorful and festive patterned paper with a punch!
 
 
Then I ran the circles through my sewing machine with a straight stitch!!
 
 
And hung up the garland!!
 
I sent a one to my cute friend Melissa at Hollyhocks and Honeybees for her birthday. She hung it up in her darling display for the holiday. Go check it out!
 
 
Here is how I made the paper pinwheels:
 
 
I started with a square of patterned paper. Then I cut in diagonally from each of the corners and punched a tiny hole in each corner.


Then I put a paper fastener through one corner...


I continued poking the paper fastener through each corner...


and finished by poking the paper fastener through the back of the pinwheel and closing the prongs.


Then I glued each pinwheel to a wooden skewer.


My daughter helped me with this banner.


We cut circles out of patterned paper and used doilies too.


We folded the circles in half...
 
 
glued them to the doilies and then onto bakers twine.
 
 
I loved crafting up all of these decorations out of paper. I think I will use these ideas to make items for upcoming holidays too!